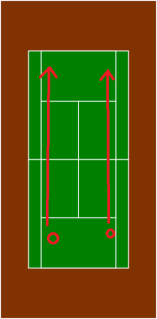
Basic Court Positioning

1) Core Area will be about 2 feet behind the baseline , and a semi-circle around that center point into the court.

This is where you spend most of the time, and is the zone generally considered the ‘recovery zone’. So after every shot, you tend to recover to this position.

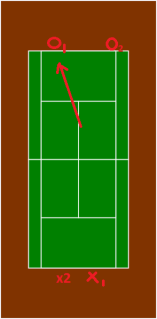
Where you recover depends on where you hit the ball.

If you hit the ball to the place marked O1, then you would recover to X1 – that is, slightly to the right of the centerline, cross-court from the ball that you just hit. The reasoning for this is that should your opponent elect to hit the ball down the line (lower percentage chance of success, more aggressive), there is a tendency for the ball to bounce on a trajectory towards the middle of the court, thus reducing the distance you have to travel. The easier, higher chance of success shot (a.k.a. higher margin shot) is the cross-court shot. This is because there is more area for you to hit the ball into, and the net is lower. So you always want to recover slightly to the crosscourt side of where you just hit the ball.

If you had just hit the ball to spot O2, then you would recover to spot X2, that is, slightly crosscourt of where you just hit the ball.

This whole area in the middle of the court is considered “no man’s land”. You either want to be on the baseline, or at the net. Anything in between is extremely dangerous and you’ll die. You’re too close in to react properly and hit groundstrokes, and you’re too far back to accurately hit volleys.

So if your opponent hits a short ball and you find yourself in this ‘no man’s land’ area, you want to hit the ball aggressively up the line and then approach the net to finish the point.

The reason you hit your approach shot up the line is because you reduce the distance you have to travel to get to the net. Unlike the baseline, you stay on the side of the court that the ball is on. This reduces the target areas for your opponent. You want to stand roughly 1 racquet length from the center line, on whatever side of the court the ball is on. The closer you are to the net, the more you cut down the angle for your opponent, but also you reduce your reaction time. You also must consider that if you touch the net with any part of your body, you lose the point. So generally you want to be 1 racquet length distant from the net when you are in volleying position.

If you hit your approach shot crosscourt, it means you have to travel a greater distance to reach the net and the opposite side of the court. It also gives your opponent more time to reach the ball. It also allows your opponent to hit their passing shot down the line, or hit their passing shot cross-court, behind the direction of your movement. So hitting approach shots down the line is the preferred tactic.

For the serve, you want to stand roughly 1 racquet length from the center T on the baseline. If you stand too far away, it makes it difficult to hit the ball up the middle, and more easy to hit the ball out wide. The opposite is true the closer you stand to the Center T.

When you are returning serve, you must recognize where your opponent is standing. If they are serving from the exact center of the court, there is little risk that they will be able to hit the ball way out wide of the court. Their most likely serve is down the center. You should adjust your position accordingly as you await their serve (r1). Vice Versa for if they are standing very far away from the center of the court. In that case you want to begin your return of serve from as wide as the doubles alley (r2).

Remember, you can always change where you stand when you are returning serve. You can move at any ponit during their serve, and although you generally begin about 1 foot behind the baseline, and 1 foot from the sideline, this is not always the case. Sometimes I return serve from inside the doubles alley. Sometimes, I stand inside the baseline. Adjusting your court positioning throws off your opponent mentally, and changes the time in which they receive the return.

Always move in as you return serve. By moving in, you reduce the angles at which the ball can bounce.

Keep your return of serve motion very compact and follow through.

This video goes over the correct recovery positions pretty clearly. The only problem is that the letters are inside the baseline. In a real game, you would obviously recover to the same positions but behind the baseline.

Did I Stutter? How to Glide on the Tennis Court with Good Balance

Why is it that the pros seem to glide on the court so effortlessly and always be in perfect position? Part of it is to do with their stellar anticipation – knowing where their opponent is going to hit the ball before it even leaves their racquet. But a large part of it is that they are able to put themselves in the absolute best position possible whenever they have the opportunity.

In some cases, you will have to be on a dead-run in order to get to your opponent’s good shot. In these cases you are sprinting towards the ball. But in most cases, especially at the amateur and intermediate skill levels, you will have so much time to reach the ball that you don’t even know what to do with yourself. You can get into what you think is good position, and wait for a couple seconds for the ball to bounce and drop into your strike zone, only to have it move on you at the last second. You had so much time! But you end up hitting it too low, too high, or too far behind you, causing errors. By taking large slow steps, you cannot make adjustments as the ball comes towards you, and you have to react to the ball at the last second – typically in a suboptimal hitting position.

If you have a slow ball coming towards you, you want to take a series of stutter steps, like in the above video. These rapid small steps give you the opportunity to adjust your body position relative to the ball. You want to always put that ball in the absolute best hitting position that you can – take it on the rise if possible, take it at nice shoulder height so you can really attack it! You may have to use the stutter steps to speed up, slow down, move in, move back, etc. But whatever they case, they help put you in optimal position to make contact with the ball in your strike zone.   You should never ever be waiting for the ball, always moving towards it. Or, if it’s a really soft one where you’re forced to wait for it to bounce, you want to be approaching it with small stutter steps and constant movement. Otherwise you’ll be sitting flat footed and have no power / control / fluidity to your stroke.

If the ball is really coming at you with a lot of pace (like on a serve), you might not have time to take any steps! But in probably 8/10 cases you should be able to take at least 2-3 stutter steps before lining up that open stance shot, or neutral stance shot, to really enable yourself to attack it.

Here’s a link to a match between Henin and Ivanovic on youtube. Listen to the sound of their movement, and try to just fixate on their feet and nothing else. Most of the time they do not have time to take stutter-steps to line up a powder-puff ball, though Ivanovic shows an example right around the 1.07 minute mark near the net. If you try to count the number of steps they’re taking during a point, there are so many it’s nearly impossible. Here  you can see Federer use a stutter step at 1hr58m33s. Again, the pros have such incredible anticipation skills and feel on the court, that they often know just where they need to be and how to move there. They’re also usually running out wide, or moving dynamically without extra time to spare. But at the amateur and intermediate level, the stutter step should be frequently utilized on every point.

Now, a lot of people look at videos on youtube of the pros on the practice courts warming up, and honestly 9/10 times they’re not using super dynamic footwork. They’re just standing near the middle of the court, warming up their shoulder and getting their hand-eye coordination going. I would never recommend looking at a pro on the practice court and to take too much from their technique. Look at their match play for true technique.

Smaller steps = better balance = better able to change direction.

Move through the shot

Always Move In

Ideally you always want to be moving into the ball when you hit it. Even if you are being pushed back by a high one, you want to move back, then on your last step (or two) move into the ball. This gets your body weight behind your shot, and uses your momentum for extra power and acceleration during your swing.

Additionally, moving in towards the ball as it approaches you means you can hit the ball at a higher point, allowing you to hit a more aggressive shot.

It also robs your opponent of recovery time.

Finally, moving in towards the ball cuts off the angle, and reduces the distance you have to run to get into position. This becomes very important on the return of serve.

In the beginning…There was the splitstep

This is an absolutely core concept for the game of tennis. You need to master the splitstep so it becomes instinct – when you are playing you cannot be consciously thinking about your feet, but it is essential for you to not be flat footed, and to be even a moderately quick player.

The split step is a little hop you do right as your opponent is about to hit the ball. You bring your feet both just slightly off the ground at the same time. You land back onto the ground at the exact time your opponent hits the ball. As you land, your legs will naturally coil like a spring.

As soon as your opponent hits the ball, you should be able to tell within a microsecond whether the ball will be coming to your forehand or backhand. As soon as you know which direction it is going, you turn your shoulders and begin to move towards the ball.

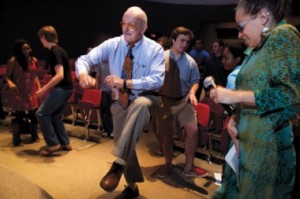
It’s the Dance, Baby!

masterT_ostow-380x253

“It’s the dance, baby!” – Master T. 

I remember vividly taking a college course on West Africa and the African diaspora. At one point a discussion arose about athleticism, and how dance and rhythm permeated the cultures of West Africa.  The world renowned art historian, Robert F. Thompson, was quick to explain what drives the outstanding performance by African and African-American athletes – “It’s the dance, baby!”

At the Bolletieri Tennis Academy in Florida – home for many years to players like Agassi and Sharapova – there’s always a radio playing somewhere with a fast beat, to keep players moving to the rhythm.

In between shots, it is important to stay on your toes. Almost as though you were skipping rope. This slight but constant weighting and unweighting on your toes allows for subtle and quick movements as you adjust. You want to watch your opponent to see how they are moving, and constantly decide where the ideal court position is to return their next ball.

Standing flat-footed is the kiss of death. If you do this, you will lose, or at the very least, you will remain in noob status. So always ALWAYS be on your toes between shots. Feel the rhythm out there – even if you’re not big into dancing, you never stand still on the dance floor.

New Kicks

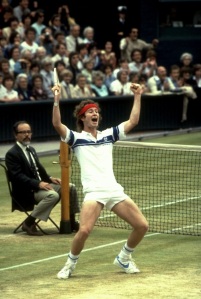
MCENROE USA WIMBLEDON VICTORY

GET TENNIS SHOES!

I can’t stress this enough. If you try to play tennis in anything other than shoes designed specifically for tennis, it will be very difficult.

Movement is probably the most important aspect of playing tennis – afterall, if you are not in the right spot to hit the ball, you’re always going to struggle no matter how good you are. Footwork is essential. Without it, you might as well be sent to the glue factory.

Movement in tennis is unique to the game, and tennis shoes are designed to promote the high amount of lateral movement the game requires. Regular runners are designed for heel-to-toe running movement, not constant shuffle stepping. It may even be dangerous as you are more likely to trip while wearing runners.

I personally like the addidas barricades.

When looking for a shoe, don’t be enticed by the super lightweight tennis shoes that are essentially all mesh and fancy looking. You want the shoe to have enough arch support that it will not twist up like a pretzel when you twist it in your hands.